Procedural Generation in Dr. Spacezoo
Using procedural generation to create an infinite number of challenging levels
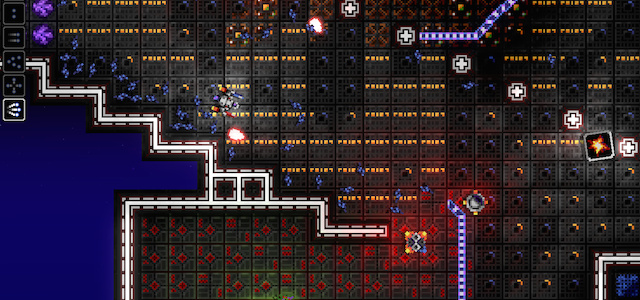
Dr. Spacezoo utilizes procedural generation to create an infinite number of challenging Space Zoos, each of which are packed full of starving space animals, dangerous enemies, and tons of grease, gibs and glow.
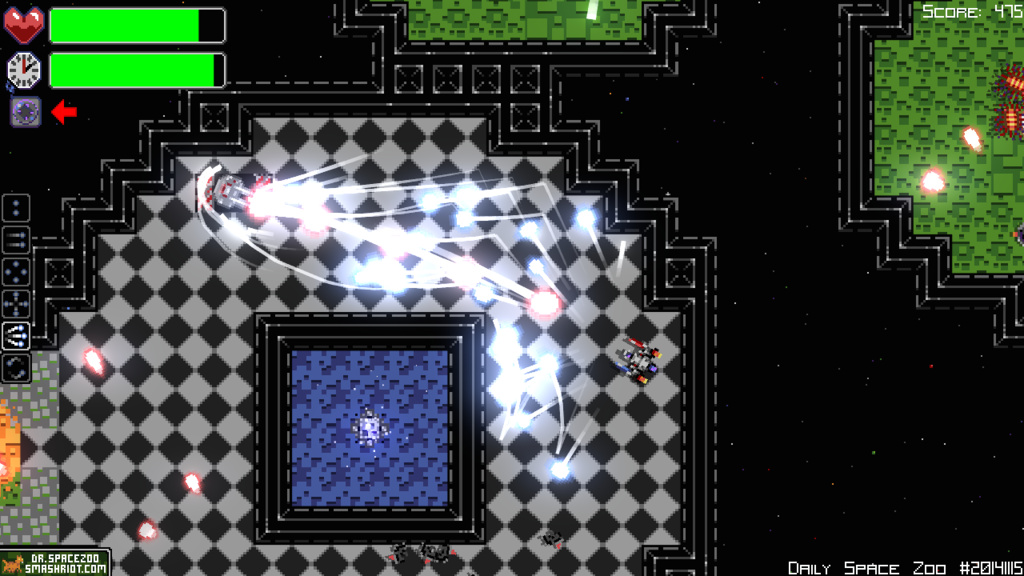
The above image is taken from a procedurally generated daily Space Zoo challenge. At the core, the procedural generation utilizes a node tree based data structure, where the nodes are placed and grown, and then connected to each other in interesting ways. The nodes and their connections are then rasterized and further processed to create a full Space Zoo. This article will detail the process of procedurally generating a Space Zoo.
Map Format
Each of the levels in Dr. Spacezoo are tile maps, and the procedural generation simply generates a map file that the map loader reads and loads just like a hand crafted map file. Each map file has a background layer, a trim layer, and a foreground layer, in addition to an object layer which defines all of the animals, enemies, objects etc. in the game. Note, the fully loaded procedurally generated Space Zoo will be y-flipped from the final result due to internal y-direction differences with the map file.
Deterministic Random Values
Every procedurally generated Space Zoo map is seeded off of the player’s name (or date in the case of the daily). This seed is utilized to create two deterministic noise arrays, the first being a rough noise map that is used to generate random values (herein referred to as rough noise), and a second being a smooth spatially aware noise map that is utilized in determining the tile pattern for each room (herein referred to as smooth noise). The smooth noise is Perlin Noise that is created using 6 octaves, 0.95 persistence, and a multi-zoom sample (1-8) for softening the noise.
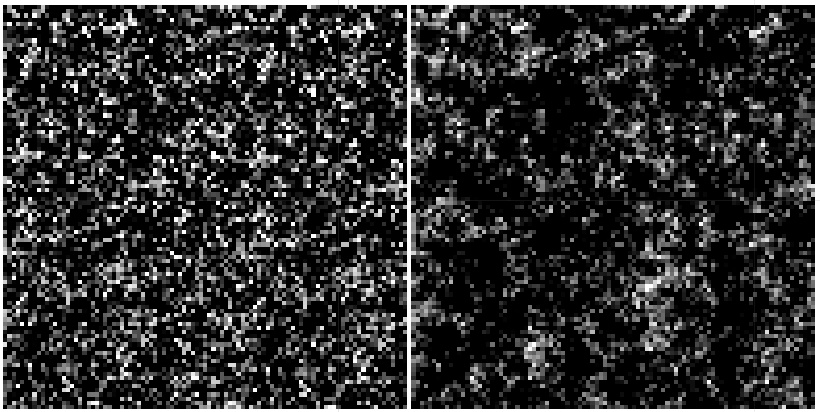
By utilizing these two noise sources, the player will be able to re-play the same exact level over and over again and it will look exactly the same as it did on a previous run.
Procedural Generation Overview
The procedural generation includes a mix of parent and child nodes, which are interconnected to form a unique Space Zoo for the player. The procedural generation starts with a node based approach to form the Space Zoos, and then switches to an image processing approach to refine and finalize the rasterized nodes of the Space Zoo.
Specifically, each room is initially represented by a node in a node tree graph, where each node has attributes such as origin for the center, parent node, child nodes, and connected nodes. Additionally, a circle node type has a radius attribute and a rectangular node type has width and height attributes. Most of the operations are performed utilizing the parent/child node references, however once the rooms are connected, the connected node references will be utilized to create the final structure of the graph. Once the graph is finalized, the nodes and connections are rasterized to an image that is further operated upon using image processing techniques.
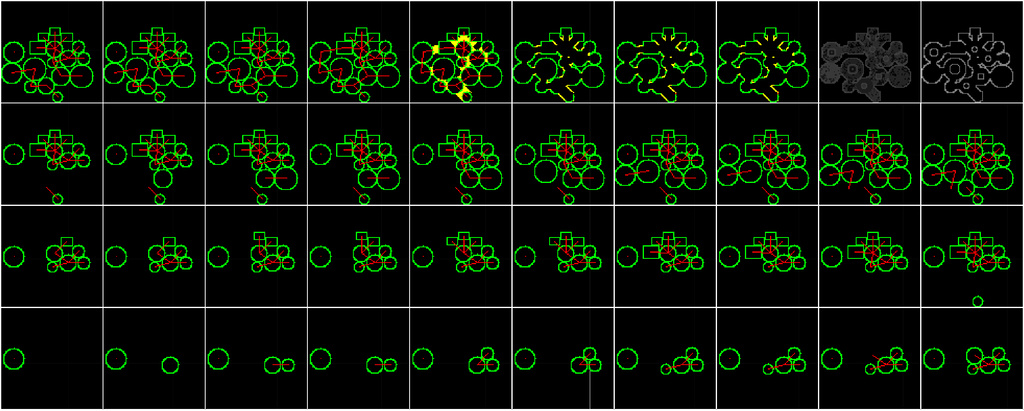
Here is an overview image for the Dr. Spacezoo procedural Space Zoo generation process that will be described below. Note that this debug image is created during the rasterization phase which happens after all the nodes have been placed, grown, and connected. The process starts in the bottom left corner of the image and steps to the final output in the top right corner.
Create and Grow Nodes
First, the size of the new map is determined based on the mission and level numbers, which allows for the Space Zoos to grow in size and complexity as the missions progress. The daily Space Zoo challenges follow a repeating four day cycle, where a Class 1 Space Zoo is small and easy, and a Class 4 is large and difficult.
After the map size is determined, the spawn node is created and grown. Next, based on the mission and level, a set number of parent nodes will be spawned, which ensures that later missions have more parent nodes than earlier missions. The parent nodes are placed in a right facing cone from the spawn node, where the angle and distance is determined utilizing rough noise values.
If a parent node is placed outside of the bounds of the map, outside the right facing cone, or inside another already placed node, then it is thrown away. During the placement of each node, standard circle to circle and circle to rectangle intersect tests are utilized to see if the new node is inside another node or outside the map bounds. Each of the parent nodes start with their radius based on a rough noise value, and if the bounds of that node exceed the map boundary then the node is thrown away. After all of the parent nodes have been placed, each is grown until it touches another parent node or the map boundary.
Next, after placing and growing all of the parent nodes, new child nodes are attempted to be placed around each parent node. The number of child nodes, and their position, starting radius, etc. are all determined utilizing rough noise values. However, based on previously placed parent and child nodes, the parent node may be unable to place any additional child nodes around it, which is ok. After all of the child nodes for a parent node are placed, those newly placed child nodes are each grown in size until they are touching another node, which helps maximize size of the child nodes and the space usage around each parent node.

Note, the debug image above shows the progression of placing child nodes around a parent node, however, it does not show the other parent nodes which exist but have not yet been rasterized.
Connect Nodes
All of the parent nodes and child nodes are arranged as a normal node tree data structure with each node having pointers to their parent / child nodes. However, connecting the nodes based on their parent/child relationship would not provide a very dynamic / organic Space Zoo. Thus, a separate connection graph is created to provide a more interesting node arrangement.
The first step in creating the connection graph is to connect each child node to its parent node. Next, each parent node is connected to the spawn node, a different parent node, its parent node, or its closest node. Connecting the parent node to a child node of another parent allows for a child node to act as a connector between the two parent nodes. Additionally, if two parent nodes are within a threshold distance of each other, they may be directly connected to each other. Further, the connections between the nodes may be further limited based on node type (only circle to rectangle, circle to circle, etc) as dictated by rough noise values.
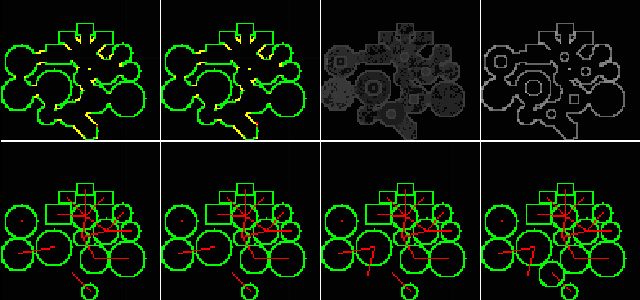
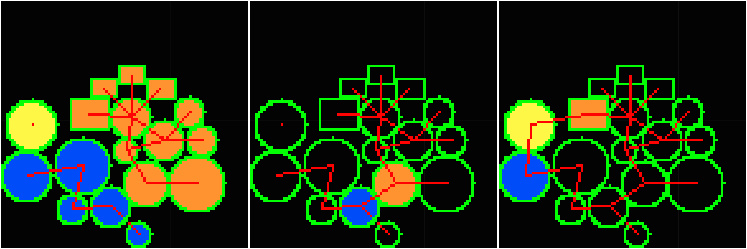
Occasionally, islands of parent/child nodes that do not have a connected path to the spawn node will form. The presence of an island of nodes may be checked using a depth first search starting at each node and attempting to traverse to the spawn node. For each unconnected island of nodes located, the closest non-island node to any node in that island is found and a connection is made. Note, at this stage, connections are merely represented as references in the node’s connection list as the nodes and their connections have not yet been rasterized as shown in the images above.
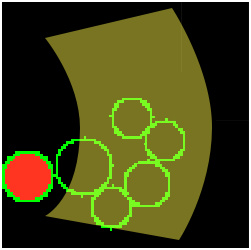
Here is an example of two islands of nodes (orange and blue) that are not connected to the spawn node (yellow). In the second image, you can see the connection made between the two closest nodes of the orange and blue islands. In the third image, the orange/blue island is connected to the spawn node is connected via two different nodes.
After all of the nodes are verified as connected, each parent node is checked to see if it is within a certain outer distance of another parent node. Based on that distance and a rough noise value, two parent nodes in close proximity that are not connected to each other may be connected. This extra connection helps provide additional main paths through the Space Zoo and strives to minimize backtracking by providing additional challenging paths between the spawn node and the target animal.
Rasterize Nodes
After all of the nodes are positioned, sized, and connected, the rasterization stage begins. In this stage, each node is drawn into an array representing the tile layer, where each pixel in the image equates to one tile in the map. These nodes are rasterized into pixels using standard circle and rectangle pixel drawing techniques. Additionally, the connections are rasterized as a line from node origin to node origin.

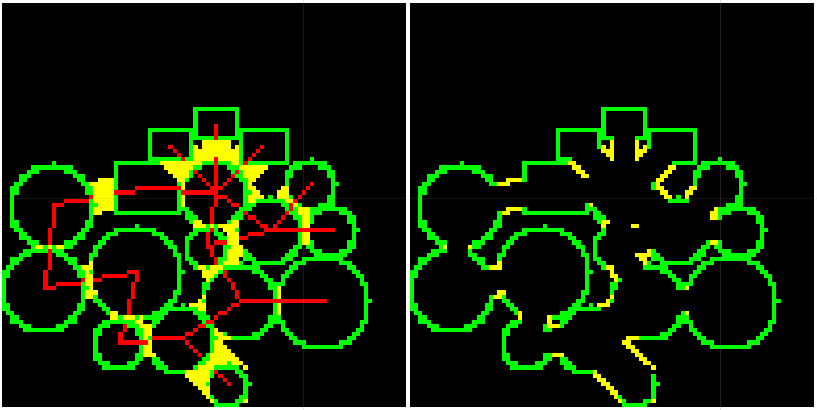
Once the node tiles and connections are rasterized, the corridors are rasterized into the tile layer array as pixels. Only the areas between nodes that are not inside any node are drawn as shown here as yellow pixels. After these yellow outer corridors are drawn, the center of the corridors are carved out from node origin to node origin, which leaves an enclosed/empty corridor path between each node.
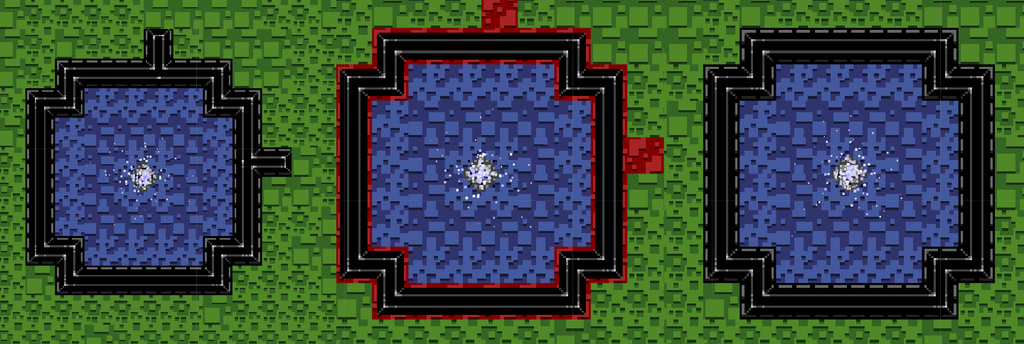
Repair Gaps
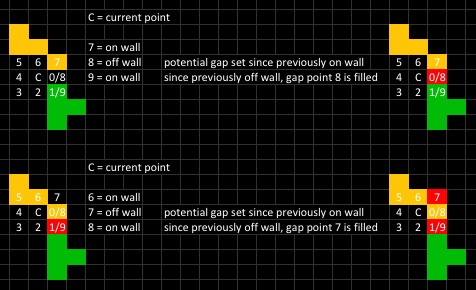
Occasionally, carving a corridor will leave a gap in the outer wall. The wall gaps are identified by checking each pixel inside of the walls starting at spawn origin (similar to a flood fill), and determining if one of its neighboring pixels represents a one pixel break in a wall. In the example below, the eight neighboring pixels are checked around the center point, and in order for the state machine to identify all gaps, the last two neighboring pixels need to be rechecked (as shown below).
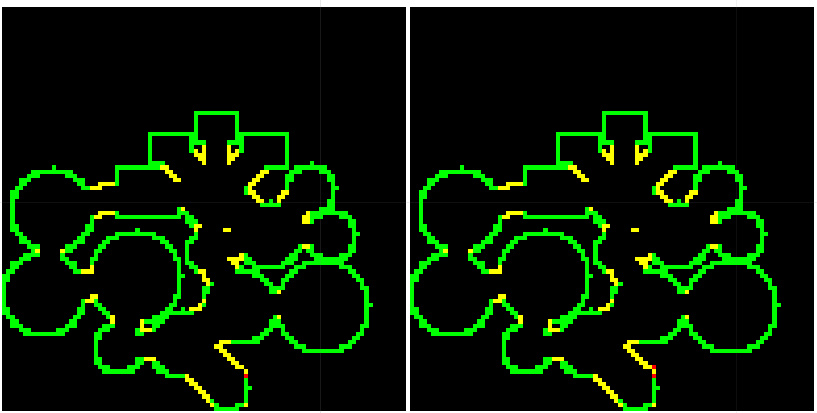
The image below shows the two gaps in the wall resulting from the formation of the corridor, and how they were filled using the above gap repairing process in order to create a fully connected outer wall:
Additionally, the creation of the node corridors may create interior spurs (single tiles which stick out) which may be smoothed away to give the wall a smoother shape. The process for smoothing is similar to the gap fixing process above, except it removes single pixels instead of filling them. Here is an example of two spurs on a fountain being removed/smoothed:
Process Background, Trim, and Foreground Layers
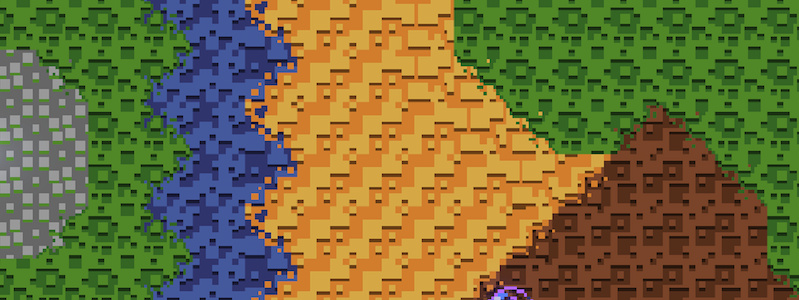
Next, the walls in the tile array are flattened to a single value and then copied to a second array. These two arrays include the base tile layer (under walls, and ground) and the foreground tile layer (walls and other collision tiles). Next, the base layer is flood filled with a base tile type (grass), and each node is filled with two tiles of the same type (e.g. grass 1 and grass 2) utilizing the spatially aware smooth noise.
The two tile types for each node are determined based on the node’s type and a rough noise value, which sets the node as a grass room, a sand room, a water room, a tile room, a gravel room, etc. In order to give some variance to the tiles in each room, each room is filled with the two tile types based on a smooth noise values at a corresponding x/y position. The smooth noise is sampled at the same x/y as the room tile, where the primary tile type for that room is used if the smooth noise value is under a threshold, and the secondary tile type is used if the smooth noise value is over the threshold. Further, the border/outline of each room is set to the under wall tile type.

After the background layer is formed, the collision layer wall tiles are set. Since the wall tiles are connected tiles, a matrix lookup is performed on each tile by sampling the NSEW points around that tile, which then indicates which tile needs to be placed. For example, if there is a wall tile to the South, East and West, then a T shaped wall tile will be placed. This ensures that all of the walls are visually connected to each other.
Next, the trim tiles are placed at the borders between two different tile types. For example, if one node uses grass types, and another node next to it uses water types, the grass trim tiles will be placed along the border to smooth the border out. This auto-tiling also uses a matrix lookup of the NSEW neighboring tiles and the resulting tile is placed into a trim tile layer (which was previously blank).
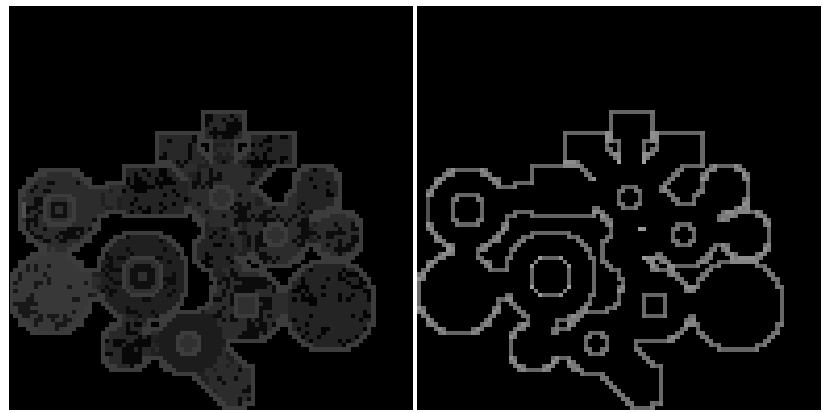
Completed Background, Trim, and Foreground Layers
Once processing is completed for the background, trim, and collision layers, they will look similar to this picture. On the left is a background tile layer with the various tile types used for each room, and on the right is the collision tile layer with all of the walls tiles properly set and connected.
Procedural Generation Flow
After the layers for the Space Zoo are generated, then the difficulty ramp is set for the rooms in Space Zoo. First, the starting spawn room difficulty is determined based on the mission number and level. For example, the spawn node is set to mission * 2 + level, which gives a range of 3-14 for levels 1-12 of mission 1, and a range of 9-20 for levels 1-12 of mission 4.
Next, the difficulty for each room is determined based on the room type (parent nodes are more difficult, child nodes are less difficult), room tile area (larger rooms are more difficult than smaller rooms), number of connected nodes (nodes with many connections to other nodes are more difficult, nodes with a few connections are less difficult), the tile distance to the spawn node (determined utilizing an A* algorithm check from node origin to spawn origin), and finally the parent node difficulty. One special case is when a child node has only 2 connections (in and out), which results in that node being a passive node with only animals and no enemies.
The resulting difficulty heat map shows a Space Zoo that starts out easy at the spawn node, and becomes progressively more difficult the further the player progresses into the Space Zoo.

Animal Placement
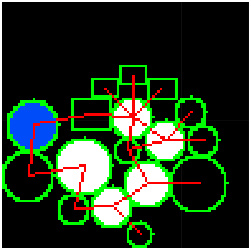
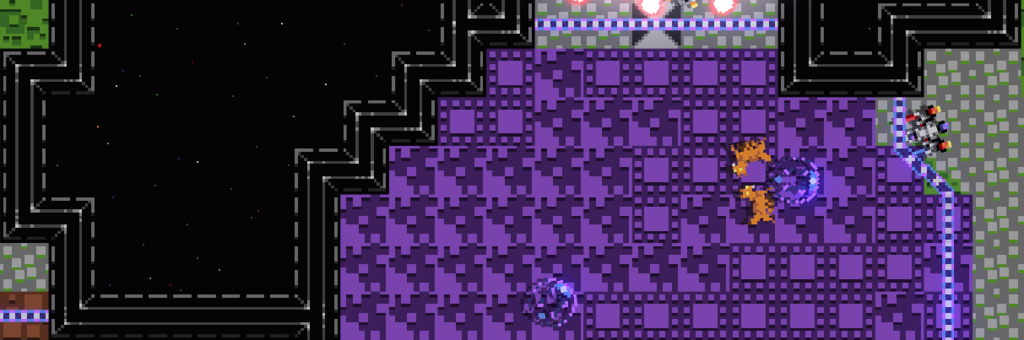
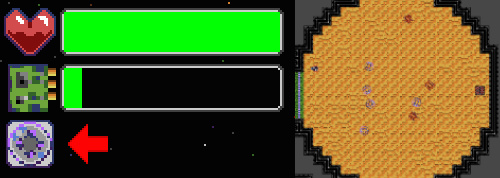
After the difficulty factor for each room is determined, the animal spawners are placed into the child nodes. The nodes that are above a threshold distance away from the spawn (a percentage distance of the furthest room) and are above a threshold difficulty (a percentage of most difficult room) are set as possible target animal spawn rooms. In the example above, the light blue Diff: 27 room at the top, and the 3 dark blue Diff: 30/33 rooms on the right are the 4 rooms that may spawn the target animal. All of the other rooms will be filled with non-target animal spawners as fodder.
In this example Space Zoo, the target animal is the Doece (purple bubble) and it spawned in the top right sand colored room (dark blue Diff: 33 room above) along with a few space house centipedes.
Barrier Placement
Next, the barriers for each child room are added around their border where there is a gap in their wall tiles, the gap being formed during the node connection phase. After placing each barrier, additional smoothing is performed on them to ensure the barrier smoothly traverses across the gap from wall to wall. Further, the strength of the barrier (weak vs strong) is set based on the number of node connections and difficulty of the room.
Enemy Placement
Next, the enemy objects for each node are determined and placed into the rooms based on room type and room difficulty. Each room type has a look-up table for enemies to spawn based on the room’s difficulty range. There is a separate enemy table for the spawn node, the parent nodes and the child nodes, and the goal is to try to keep the player consistently challenged while progressing through the Space Zoo.
As an example, the spawn node will have a set of enemies that provide resistance on the way back out of the Space Zoo when the timer is nearly expired, and will favor turrets and spawners which offer delayed resistance. Further, the parent nodes are going to have a mix of more free moving enemies such as sentries and rambots, and fewer fixed position enemies such as turrets. The child rooms will have a more fixed position enemies such as turrets, and a fewer sentries and rambots. A planned enhancement is to further categorize the rooms into different encounter types, each of which have a dynamic set of enemies for the room’s encounter type and difficulty.
As shown in the flow heat map above, some child rooms were labeled as passive nodes (red, Diff:0). These passive nodes provide a small breather to the player, before ramping difficulty back up in the node which follows it.
Timer
The amount of time given to complete each procedurally generated Space Zoo is determined based on enemies spawned and the overall area of the Space Zoo. The timer starts with a base amount of time (e.g. 20 seconds), then adds time based on each enemy type spawned (e.g. 3 seconds per sentry spawned, 4 seconds per rambot spawned, etc.), and finally adds time based on the overall tile area of the zoo divided by the number of seconds allocated per tile (e.g. 1 second added per every 70 tiles of area). Thus far, this method has resulted in a pretty tight timer that forces the player to move quickly to complete the daily Space Zoo. The mission levels may provide a slightly more forgiving timer to allow for more exploration, which will be accomplished by increasing the base time, time per enemy, and lowering the number of tiles per second.
In Closing
The end result of the procedural generation is a unique and challenging Space Zoo. The Daily Challenge and Mission 2 use the above method of generating Space Zoos, and Mission 3 uses additional criteria to give the Space Zoos a different feel from the organic style detailed above.
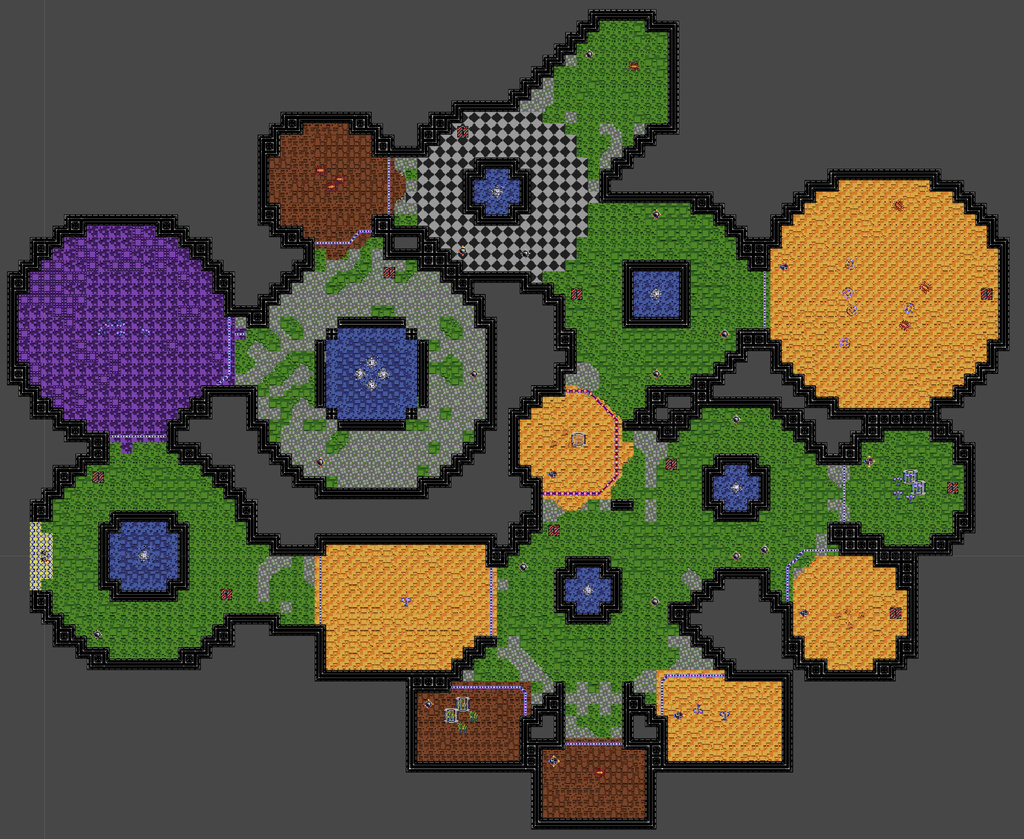
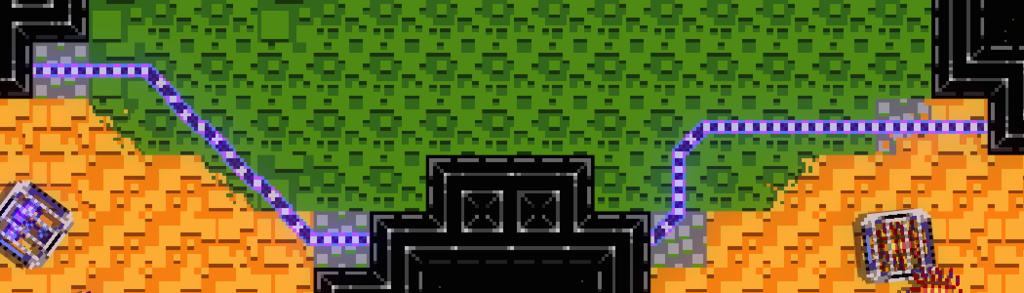
The image below is the final Space Zoo shown in the steps above. Note that it is y-flipped from all of the above generation images due to a difference in map loader’s y-direction.
Further Information
- PROCJAM 2014 - Flow In Procedural Generation - Tom Coxon: Slides
- PROCJAM 2014 - Flow In Procedural Generation - Tom Coxon: Video
- Unite 2014 - Generating Procedural Dungeons in Galak Z
I hope you found this article on Procedural Generation in Dr. Spacezoo interesting, and I’d love to discuss it further if you have any questions.
Jesse from Smash/Riot