Environmental Shadows for 2D Sprites in Futile for Unity
Use a shadow render texture and a custom shader to create environment shadows for 2D Sprites
This article will describe how to utilizing a shadow render texture and a custom shader to create environment shadows for 2D Sprites in Futile/Unity.
Background
This is a follow-up to >Normal Mapped Lighting for 2D Sprites in Futile for Unity, and will build upon the ideas presented in that article for the normal mapped lighting shader. To summarize, the shadow creation process includes: generating a light mesh for each light source, rendering the light meshes to a shadow render texture using a camera, and then sampling the shadow render texture in a shader to produce the final value for each fragment.
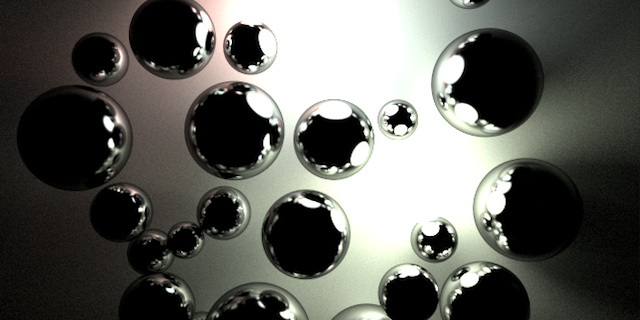
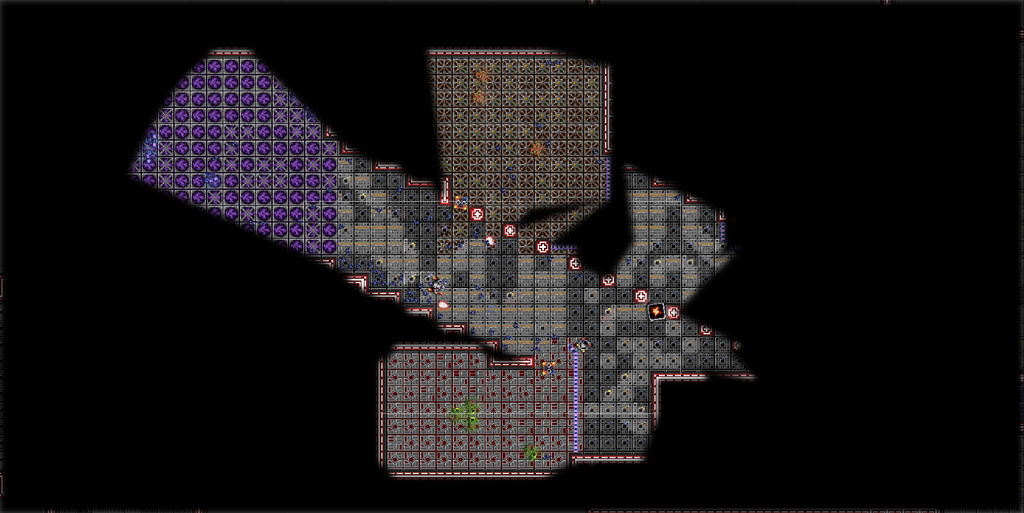
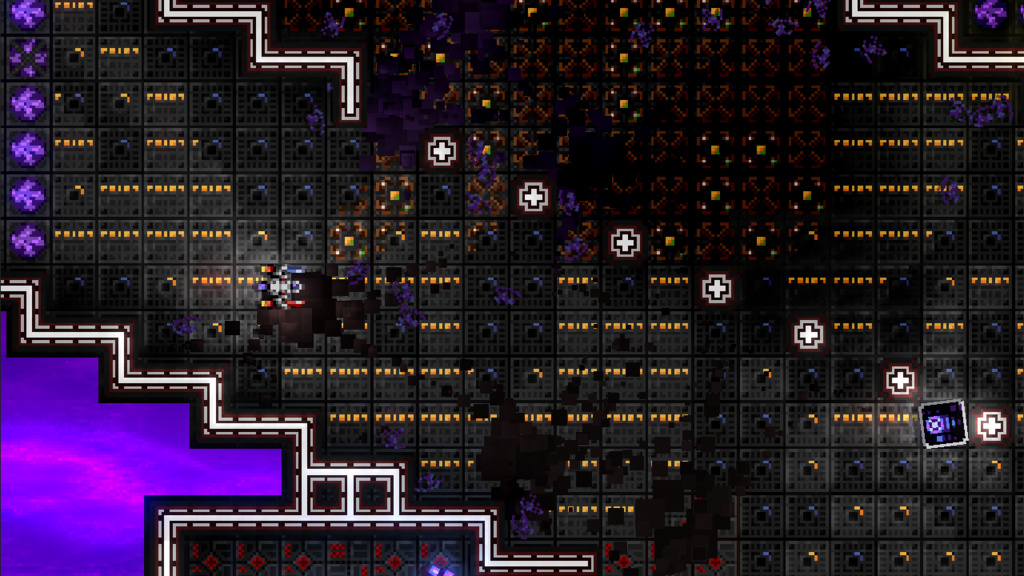
Here’s a sample of the shadow effect to be described below:
Light and Shadow Shader Overview
Dr. Spacezoo utilizes a custom shader in forward lighting mode that utilizes a normal map, emission map, and a shadow map. In the normal mapped lighting article, the lighting calculations are performed within the Forward Add passes of the shader, whereas the shadow mapping described below is done within the Forward Base pass of the shader. The shadow geometry and texture are fairly fast to generate with a reasonable number of active light casting objects.
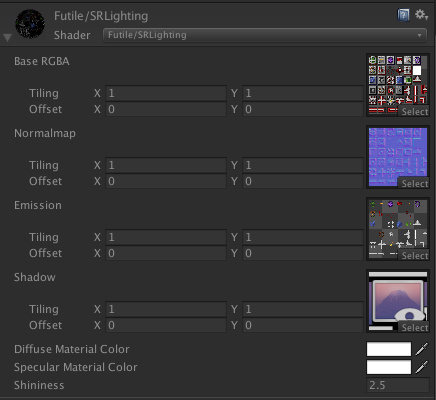
Here is an image from the Unity inspector of the lighting shader, where the shadow map render texture is passed via a Texture2D parameter of the shader.
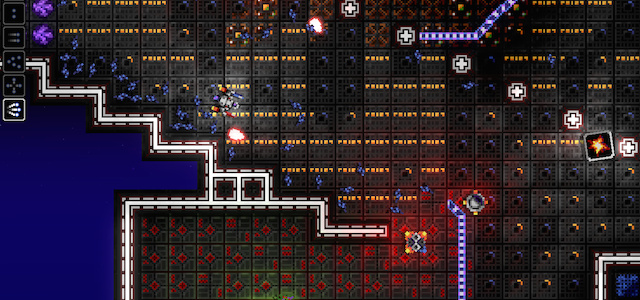
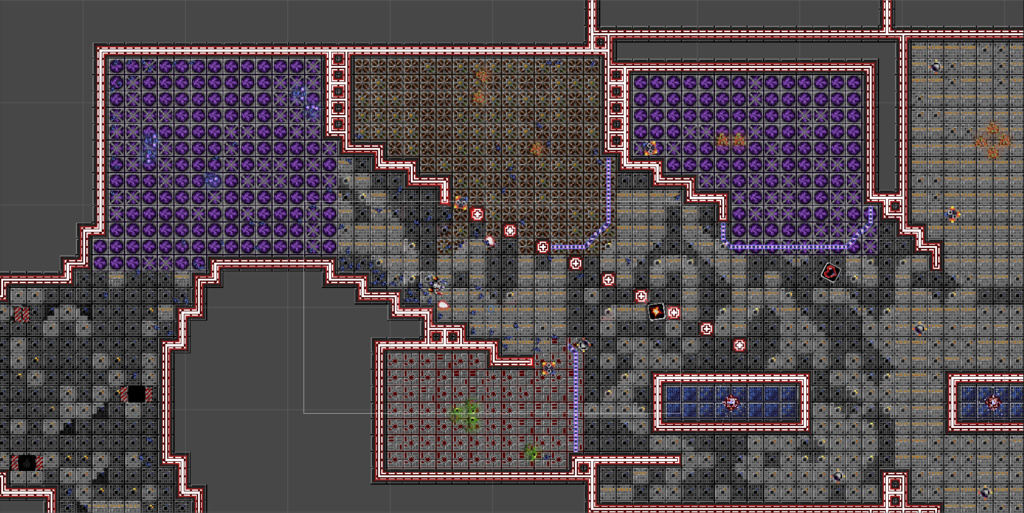
As a reference, here is how the scene looks without any lighting or shadows applied.
Light Meshes
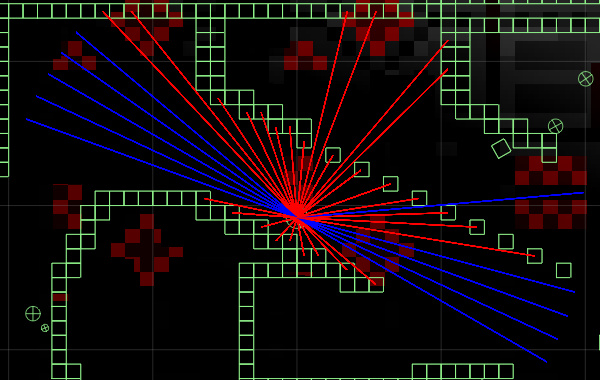
In order to create shadows, first need to determine what part of the scene is lit up. Each object has a light source component that is turned on/off based on it’s distance to the camera viewport in order to save CPU/GPU time on unseen lights/shadows. If a light source component is enabled, the light source component will perform a linecast around the parent object to locate the edges of the geometry around it. In Dr. Spacezoo, the linecast mask includes terrain, barrier, and destructible object layers (e.g. mask = 1 << TERRAIN | 1 << BARRIER | 1 << DESTRUCTIBLE).
The number of linecasts made around the object is based on how fast moving/important the light is. For example, the player object performs a linecast every 5 degrees in a circle around itself, whereas an animal performs a linecast every 12 degrees around itself.
The image below shows linecasts for a player, where the red lines collided with terrain and the blue lines did not. Note, the length of the linecasts is not infinite length, and is configured based on how much light that object should produce (player = large, animals = small).
Here is some sample code for the linecasts for an object. Note, in Dr. Spacezoo there is a scale difference between physics (meters) and rendering (points) so FPhysics.POINTS_TO_METERS is used to convert. There are opportunities for optimization during the linecast phase (e.g. improved wall detection/retention), but for now this implementation is fast enough.
// lightPosition is in world space, need to convert to physics space
Vector3 startPos = new Vector3(this.parentNode.x * FPhysics.POINTS_TO_METERS, this.parentNode.y * FPhysics.POINTS_TO_METERS, 0); // convert to physics space and set Z=0 (normally -20)
// linecast around object in a circle to find walls
// lightIncrementer indicates how fine/coarse the linecasting is. e.g. player uses 3 (120 casts), animals use 12 (30 casts)
for (int i=0; i<360; i+=this.lightIncrementer){
Vector3 targetPos = SRUtil.calculatePointOnCircle(this.lightDistance, i, startPos);
// linecast between points. this.collisionMask includes layers such as walls and barriers
bool raycastHit = Physics.Linecast(startPos, targetPos, out hit, this.collisionMask);
if (raycastHit){
lightPoints[linePointsCounter++] = new Vector2(hit.transform.position.x, hit.transform.position.y);
}
else {
lightPoints[linePointsCounter++] = new Vector2(targetPos.x, targetPos.y);
}
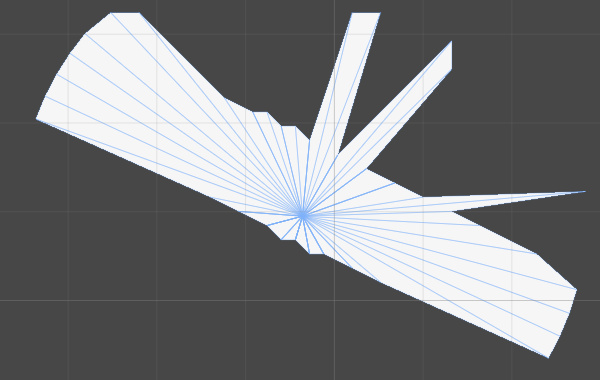
}Once the end point of each linecast is determined (either hits an object or doesn’t), the point is added to an array that is used to create the mesh for the light. The linecast hit points are then triangulated into a mesh with a white texture, where the opacity of the mesh corresponds to the strength of the light (alpha of 1.0 = full light, 0.0 = darkness). Alpha for important lights (e.g. player) are set close to 1.0, whereas other lesser lights (e.g. animals) may be set in the 0.5-0.7 range to allow for overlapping lights to be intensified.
In Futile, a FMeshData is used to hold the triangle data for the light mesh, which is then passed to a FMeshNode that is rendered to the scene.
Create triangles from each linecast point:
// create triangles
FMeshData fmeshData = new FMeshData();
if (linePointsCounter >= 2){
    for (int i=0; i<linePointsCounter; i++){
        // public FMeshTriangle AddTriangle(FMeshVertex vertex1, FMeshVertex vertex2, FMeshVertex vertex3)
        FMeshVertex vertex1 = new FMeshVertex(startPos.x * FPhysics.METERS_TO_POINTS, startPos.y * FPhysics.METERS_TO_POINTS, 0, 1);
        FMeshVertex vertex2 = new FMeshVertex(lightPoints[i].x * FPhysics.METERS_TO_POINTS, lightPoints[i].y * FPhysics.METERS_TO_POINTS, 0, 1);
        FMeshVertex vertex3;
        if (i < (linePointsCounter-1)){
            vertex3 = new FMeshVertex(lightPoints[i+1].x * FPhysics.METERS_TO_POINTS, lightPoints[i+1].y * FPhysics.METERS_TO_POINTS, 0, 1);
        }
        // past end so use starting vertex
        else {
            vertex3 = new FMeshVertex(lightPoints[0].x * FPhysics.METERS_TO_POINTS, lightPoints[0].y * FPhysics.METERS_TO_POINTS, 0, 1);
        }

        // translate to shadowStage position (the RT)
        vertex1.x += SRConstants.SHADOW_RT_OFFSET_X;
        vertex1.y += SRConstants.SHADOW_RT_OFFSET_Y;
        vertex2.x += SRConstants.SHADOW_RT_OFFSET_X;
        vertex2.y += SRConstants.SHADOW_RT_OFFSET_Y;
        vertex3.x += SRConstants.SHADOW_RT_OFFSET_X;
        vertex3.y += SRConstants.SHADOW_RT_OFFSET_Y;

        // add triangle to mesh
        fmeshData.AddTriangle(vertex1, vertex2, vertex3);
    }
}
After the points are triangulated, the mesh is updated with the new triangles:
// create mesh node if needed and add to stage
if (this.meshNode == null){
this.meshNode = new FMeshNode(fmeshData, Futile.whiteElement);
Color meshColor = Color.white;
meshColor.a = this.lightIntensity;
this.meshNode.color = meshColor;
this.parentStage.AddChild(this.meshNode);
}
// exists, assign mesh data
else {
this.meshNode.meshData = fmeshData;
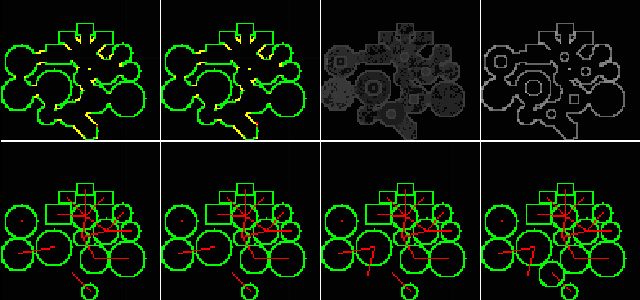
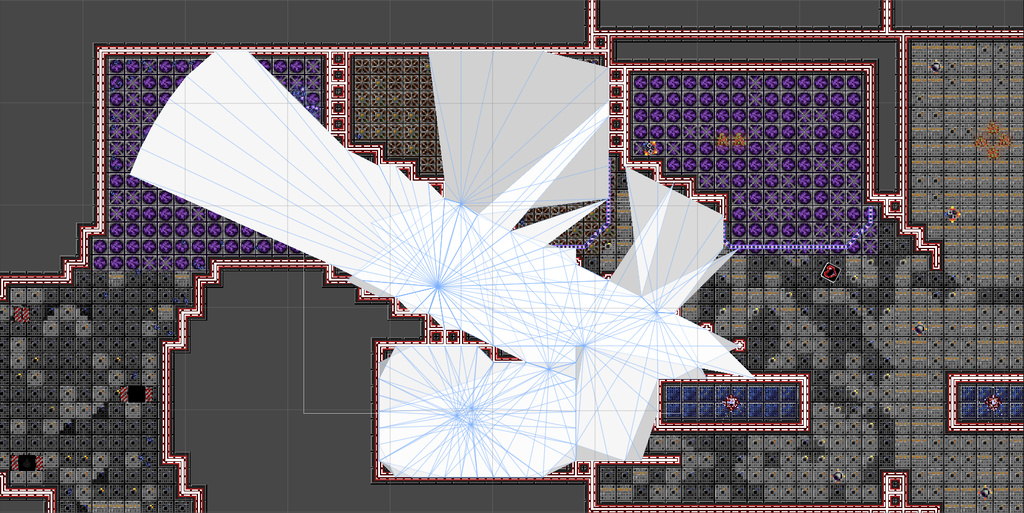
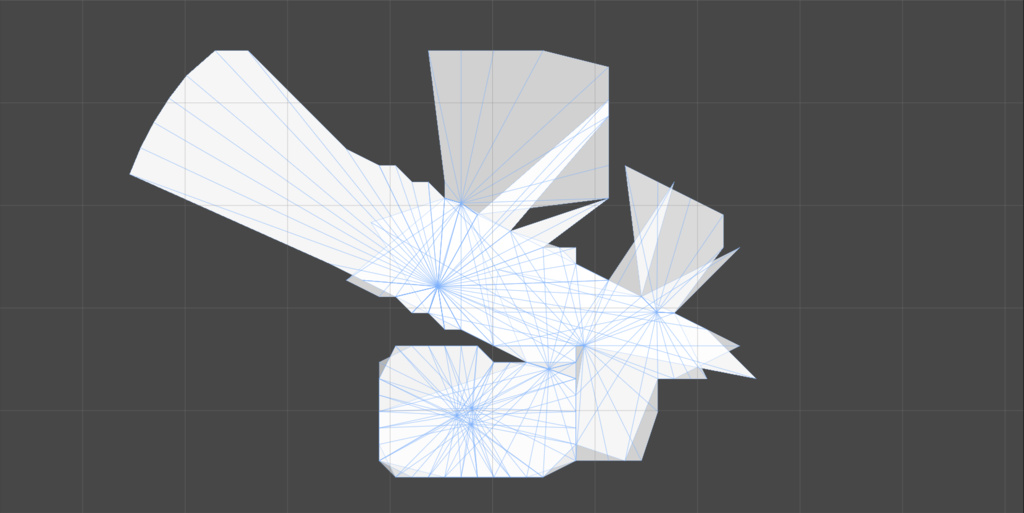
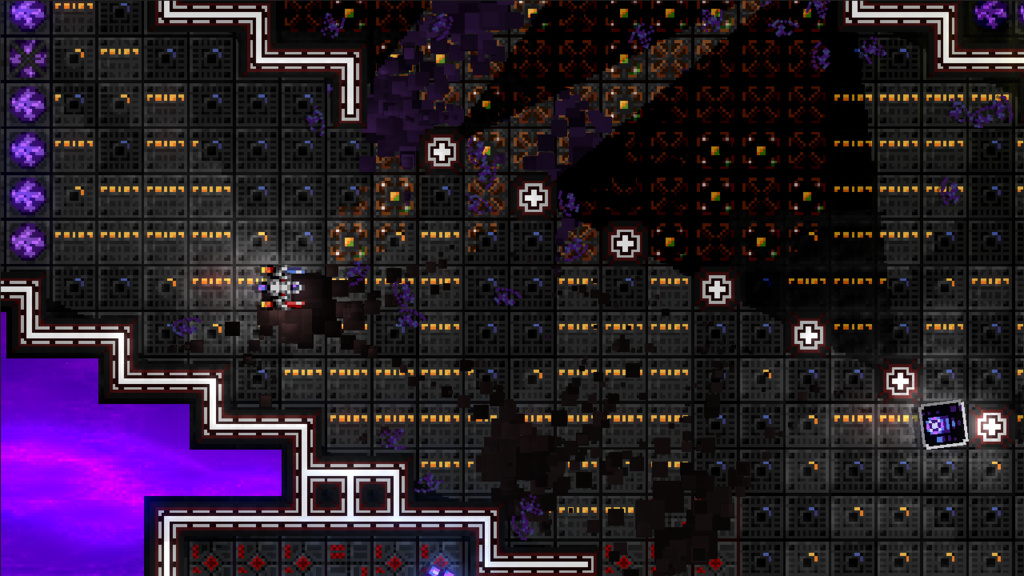
}The composite image below shows the light casting objects, the linecasts made by each object, and the light casting mesh overlaying the scene.
![]()
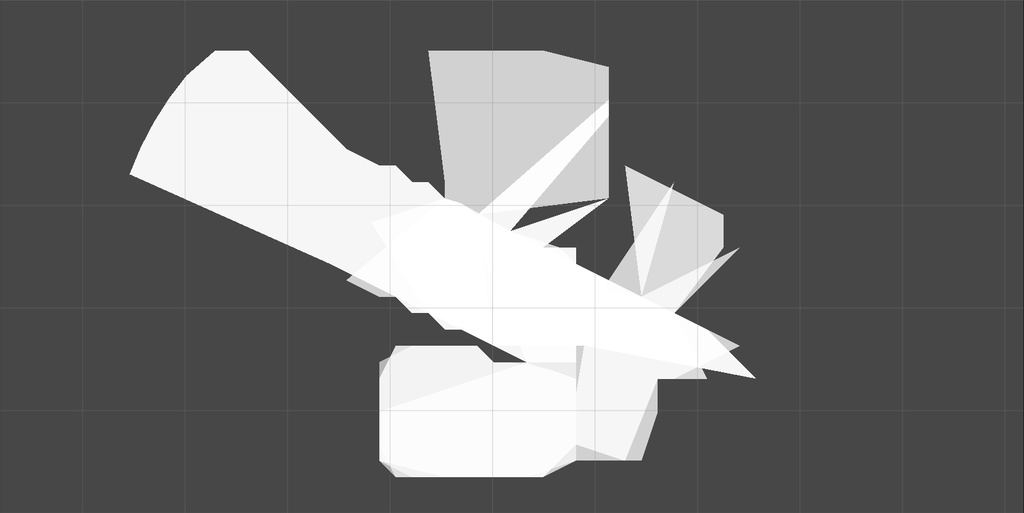
And here is the same image without the light casting objects overlaid:
In the example below, a small render texture is created and a Shadow RT Camera is setup to render to this texture. In this example, the Shadow RT Camera is setup away from the main camera (SHADOW_RT_OFFSET_X/Y) so the light meshes don’t interfere with the main camera. However, the Shadow RT Camera could be used with a shadow stage set to a specific renderlayer (e.g. shadowStage.layer = maskNumber) and the Shadow RT Camera’s culling mask could be set to that maskNumber too (e.g. shadowRenderTextureCamera.cullingMask = 1 << maskNumber).
Also, the resolution of the shadow render texture should match the internal rendering resolution. For example, Dr. Spacezoo is rendered at 1280x720 at a scaler of 4, so the shadow render texture is 320x180 in order to match the unscaled resolution which keeps pixel sizes consistent.
private void setupShadowRenderTexture(){

    // setup render texture:
    this.shadowRenderTexture = new RenderTexture((int)320, (int)180, 16, RenderTextureFormat.ARGB32);
    this.shadowRenderTexture.Create();

    // rt camera - offset by SHADOW_RT_OFFSET_X/Y
    this.shadowRenderTextureCamera = Futile.instance.CreateNewCamera("Shadow RT Cam");
    this.shadowRenderTextureCamera.transform.position = new Vector3(SRConstants.SHADOW_RT_OFFSET_X, SRConstants.SHADOW_RT_OFFSET_Y, -10.0f);
    this.shadowRenderTextureCamera.depth = SRConstants.CAMERA_DEPTH_BACKGROUND;
    this.shadowRenderTextureCamera.clearFlags = CameraClearFlags.SolidColor;
    this.shadowRenderTextureCamera.backgroundColor = new Color(0.0f, 0.0f, 0.0f, 0.0f);
    this.shadowRenderTextureCamera.targetTexture = this.shadowRenderTexture;
    this.shadowRenderTextureCamera.targetTexture.filterMode = FilterMode.Point;

    // add blur shader. 2 iterations, 2 point spread
    Blur blur = this.shadowRenderTextureCamera.gameObject.AddComponent<Blur>();
    blur.blurShader = Shader.Find("Hidden/BlurEffectConeTap");
    blur.iterations = 2;
    blur.blurSpread = 2.0f;

    // load texture (don't forget to unload on cleanup)
    Futile.atlasManager.LoadAtlasFromTexture("shadowRTTexture", this.shadowRenderTexture);

    // sprite to show render texture output.  if not added to the scene the RT doesn't apply the blur.  set invisible to hide, but still blurs.
    FSprite shadowRenderSprite = new FSprite("shadowRTTexture");
    shadowRenderSprite.scale = 2.0f;
    shadowRenderSprite.isVisible = false;
    shadowRenderSprite.x = SRConstants.SHADOW_RT_OFFSET_X2;
    shadowRenderSprite.y = SRConstants.SHADOW_RT_OFFSET_Y2;
    this.AddChild(shadowRenderSprite);
}
The blur shader is only applied to the camera if the render texture is actually used in the scene. It would not apply the blur when only rendered to texture (e.g. no shadowRenderSprite added to the main stage).
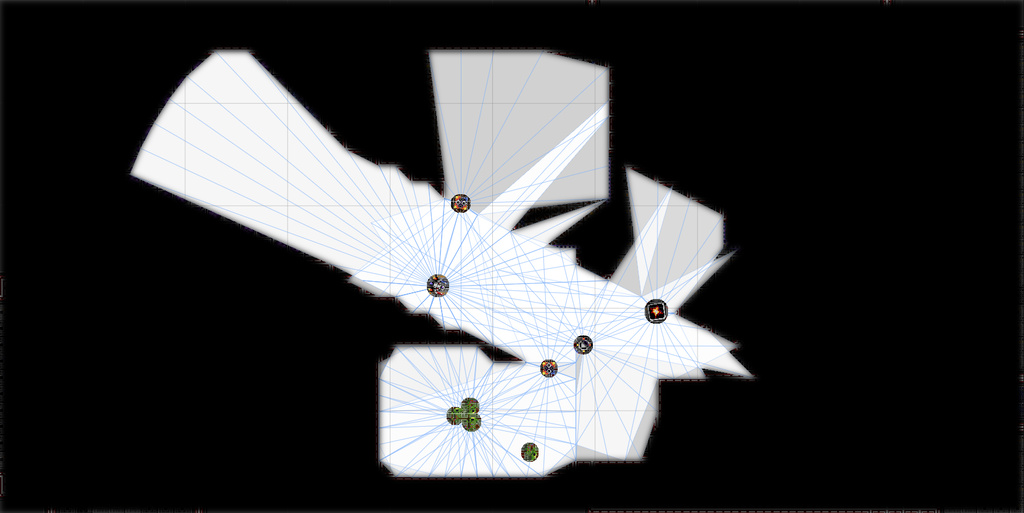
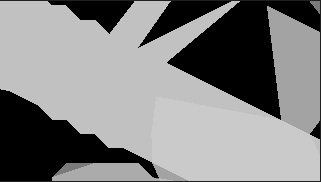
Here is how the light geometry looks when rendered for the Shadow RT Camera.
The different resulting alpha values from each light casters' mesh provide some variances in the final lighting.
Light Meshes to Render Texture
Now that each of the light casters' geometry is output, the Shadow RT Camera can render them to the shadow render texture. Since this shadow render texture is going to be sampled for each fragment in the lighting shader, the Shadow RT Camera needs to match the Main Camera’s size and projection to ensure that the final clip space coordinates line up. In Dr. Spacezoo, every time the Main Camera’s size and position is updated, the Shadow RT Camera’s size and position are also updated. The Shadow RT Camera has a background that is cleared black, which makes up the shadow part.
// e.g. mainCamera = Futile.instance.camera
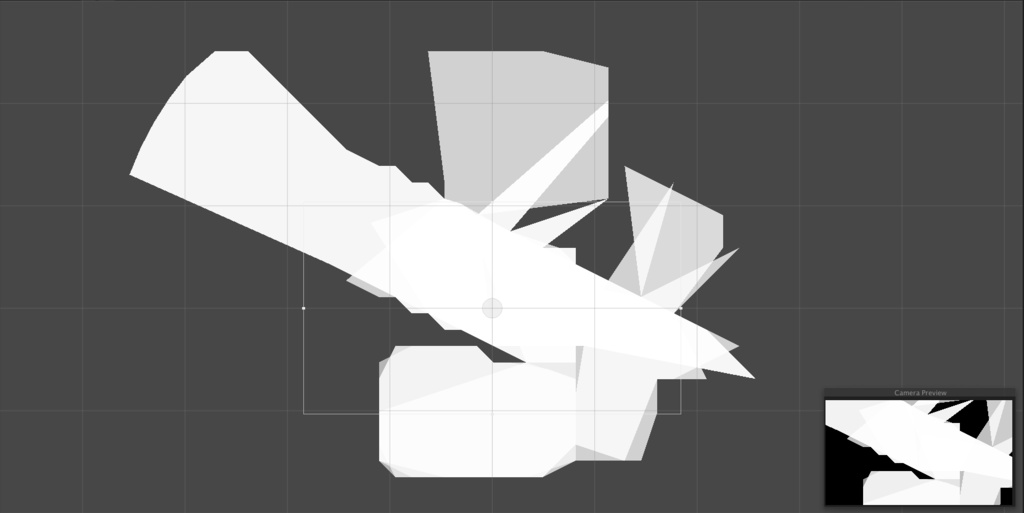
this.shadowCamera.orthographicSize = this.mainCamera.orthographicSize;Here’s an image of the active light casters' light geometry and the Shadow RT Camera’s viewport which shows the portion that is being rendered to the render texture.
Here’s a rough composite image of what the light geometry captured by the Shadow RT Camera’s looks like on the shadow render texture.
Here’s a rough composite of the shadow render texture overlaid on the unlit scene to illustrate where the shadows are rendered.
Softening the Shadows
Real world shadows have a few different parts, and this shader roughly simulates the Umbra, which is the inner dark part of the shadow where the light is completely blocked, and the Penumbra, which is the softer part of the shadow near the edge. The resulting shadows created by the linecasting method above have very sharp edges and only show the umbra part of the shadow. However, it’s fairly easy/cheap to simulate the penumbra, which will give the shadows a softer more realistic look.
Here’s an image that shows the hard shadows generated and stored in the render texture for the scene:
Here’s the result of applying these hard shadows to the scene:
In order to soften these hard shadows, a blur image effect is applied to the Shadow RT Camera before it renders the geometry to the shadow render texture, which results in softer/more realistic shadows.
Here’s the result of applying the softened shadows to the scene:
Clip Space and the Shadow Render Texture
The real magic in getting the shadows to work was figuring out how to sample the shadow texture for each fragment in the shader. It’s a simple idea, but it took a lot of experimentation to get it to work properly.
The shadow texture is created to correspond to the clip space output for the shader. In the shader, each fragment input/output has a “pos” which is set by Unity’s SV_POSITION shader define. SV_POSITION operates just like POSITION, except that SV_POSITION is said to be more cross-platform than POSITION.
The main problem was that the fragment’s “pos” wasn’t working as I thought it should when sampling the shadow texture. The first calculated “pos” simply wasn’t usable/working in the shader, and a usable clip space position value “clipPos” needed to be explicitly calculated again. I’ve chalked this behavior up to a random undocumented quirk of Unity, which I’ve now documented here.
For each fragment being output, explicitly calculate it’s clip space position (clip space range is from -1.0 to 1.0, with the camera center being 0.0) using mul(UNITY_MATRIX_MVP, i.vertex). Next, translate the clip space position to a UV position in the shadow texture (UV range is 0.0 to 1.0), and use the value in the shadow texture for that UV position to alter the fragment being output. In this implementation, the value in the shadow texture is inverted, and then a portion of this is subtracted from the final fragment value to darken it.
// -------------------------------------
struct FragmentInput {

    float4 pos : SV_POSITION;    // used instead of POSITION for max cross plat. NOTE, this clip space value is not usable in shader
    float4 color : COLOR;
    float2 uv : TEXCOORD0;
    float4 clipPos : TEXCOORD1;  // clip space, usable in shader
};

// -------------------------------------
FragmentInput vert(VertexInput i){

    FragmentInput o;

    o.pos = mul(UNITY_MATRIX_MVP, i.vertex);     // transforms to clip space: -1 to 1: TOTALLY USELESS IN SHADER
    o.color = i.color;
    o.uv = float2(i.uv.xy);
    o.clipPos = mul(UNITY_MATRIX_MVP, i.vertex); // transforms to clip space: -1 to 1: USABLE IN SHADER

    return o;
}
The diffuse/ambient/shadow values are sampled during the ForwardBase pass in the shader.
// -------------------------------------
float4 frag(FragmentInput i) : COLOR {

    float4 diffuseColor = tex2D(_MainTex, i.uv);
    float3 ambientLighting = float3(UNITY_LIGHTMODEL_AMBIENT.xyz) * float3(diffuseColor.xyz) * float3(i.color.xyz);

    // use min alpha from diffuseColor/sprite color as to allow for per sprite transparency.
    float4 finalColor = float4(ambientLighting, min(diffuseColor.a, i.color.a));

    // sample shadow map and add shadows
    float2 shadowUV;
    shadowUV.x = (i.clipPos.x + 1) * 0.5; // now in range of 0..1
    shadowUV.y = (i.clipPos.y + 1) * 0.5; // now in range of 0..1
    float4 shadowColor = float4(1.0, 1.0, 1.0, 1.0) - tex2D(_ShadowTex, shadowUV.xy); // invert

    // sub out some of the shadow color from the fragment color
    finalColor -= (0.25f * shadowColor); // 0.25 is the shadow intensity. 0.0=no shadow, 0.15=light, 0.4=dark, 1.0=super dark no ambient

    // set final alpha based on diffuse alpha
    finalColor.a = diffuseColor.a;

    return finalColor;
}
And that’s it, you should now be able to add fast environment shadows for 2D Sprites using Futile for Unity (and similar techniques should be applicable to 2D sprites in Unity).
Additional References
Here are a few references I found helpful during the creation of the above shadow system, which also describe a few additional steps that may be taken to further optimize the shadow system.
- https://www.redblobgames.com/articles/visibility/
- https://forum.unity3d.com/threads/2d-dynamic-shadows.165283/
In Closing
Hope you found this article on implementing Shadows for 2D Sprites in Futile/Unity interesting,
Jesse from Smash/Riot