Unity Build Automation with Jenkins
Automatically create new Unity builds
This article will discuss Unity Build Automation using Jenkins, an open source automation and continuous integration server, to automatically create new Unity3d builds when the master Git branch is updated.
Automating repetitive chores is a good idea when working on a project, and one such chore is building the product after each feature or bug fix is merged into the master branch. This article on Unity Build Automation is one option to automate the process of creating, packaging, and distributing builds for multiple platforms. Another option is to use a build automation server to monitor a source control branch and kick off new builds in response to a change.
In this article, I’m going to outline the steps for automating the build process utilizing a Jenkins build server to watch a Git branch for changes and automatically create a new build in response to any changes.
Jenkins Setup
First, prep the machine you are going to install Jenkins on and ensure that it has the necessary JRE version. I’m hosting Jenkins on an older Mac Mini running MacOS Mojave with Java(TM) SE Runtime Environment 1.8.
Next, download the appropriate Jenkins installer for your platform and get it installed. See platform specific installer tips such as the <MacOS Installer doc, the Jenkins Install Doc, or the general Jenkins Doc.
After Jenkins is installed, you should be directed to http://localhost:8080 to login/unlock using the password created by the installer. e.g. cat /Users/Shared/Jenkins/Home/secrets/initialAdminPassword
Once logged in, will need to select and install plugins. I installed the default plugins, plus:
- Build Name Setter
- Build Timeout
- Dashboard View
- Folders Plugin
- Git Parameter Plug-in
- Timestamper
- Unity3d plugin
After installing plugins, you will be prompted to create a new Admin login/password, after which Jenkins will be ready for use.
Next, take a pass through the Jenkins configuration (Jenkins -> Manage Jenkins -> Configure System) and configure it for your purposes (e.g. URL, admin e-mail, SMTP server, etc).
One last bit of configuration on MacOS. In order for Jenkins to be able to auto-update, you will need to set the jenkins user as owner of the jenkins.war file.
sh-3.2# cd /Applications
sh-3.2# pwd
/Applications
sh-3.2# chown -R jenkins Jenkins/
sh-3.2# chgrp -R jenkins Jenkins/
sh-3.2# ls -al Jenkins/*.war
-rw-r--r--  1 jenkins  jenkins  77330993 Apr 29 09:45 Jenkins/jenkins.war
sh-3.2#<
Git Credentials
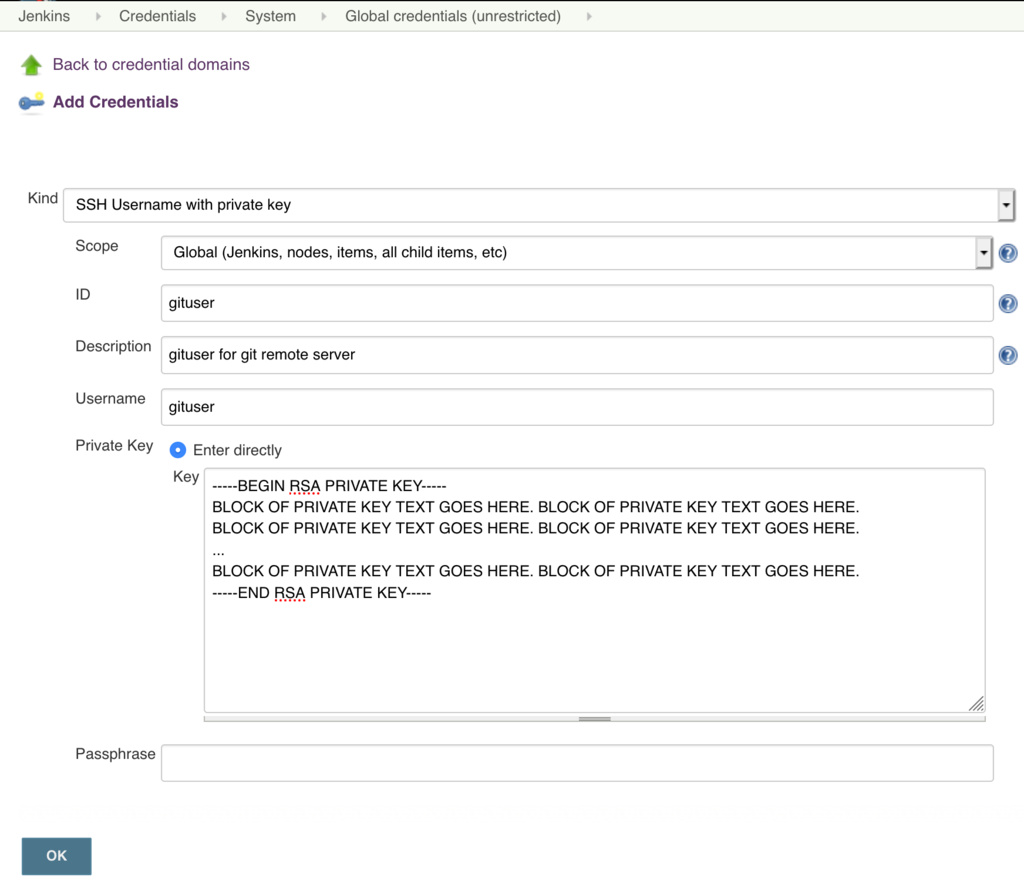
Next, you will need to create credentials to your Git server for Jenkins. On the Git server, create a new user/sshkey for the repo(s) you wish Jenkins to access, and then add that to Jenkin’s Credentials for the System. These Git credentials will be selected when setting up the build view later.
[user@server .ssh]# ssh-keygen
Generating public/private rsa key pair.
Enter file in which to save the key (/home/user/.ssh/id_rsa): /home/user/.ssh/id_rsa.jenkins
Enter passphrase (empty for no passphrase):
Enter same passphrase again:
Your identification has been saved in /home/user/.ssh/id_rsa.jenkins.
Your public key has been saved in /home/user/.ssh/id_rsa.jenkins.pub.
The key fingerprint is:
12:34:56:78:90:12:34:56:78:90:12:34:56:78:90:12 user@server
[user@server .ssh]#
Keep these private and public keys safe. The public key should be added to your remote Git server, and the private key will be added to Jenkins under Credentials.
MacOS and Unity
I took some additional steps to prepare Jenkins for building with Unity.
First, Open MacOS Settings -> User & Groups. Jenkins created a new Standard account. Right click on jenkins and select Advanced. Fill in an account name and icon, and reset the password to something new. Also, under User & Groups, enable Fast User Switching.
Next, login as the Jenkins user and setup the Unity build environment: install Unity Hub, log in and authorize this build machine for the Unity license, and install the necessary versions of Unity (e.g. 2018.3.x), etc.
Once Unity Hub and Unity were installed, I created a new sample project to ensure Unity was all set to build for the required OS platforms.
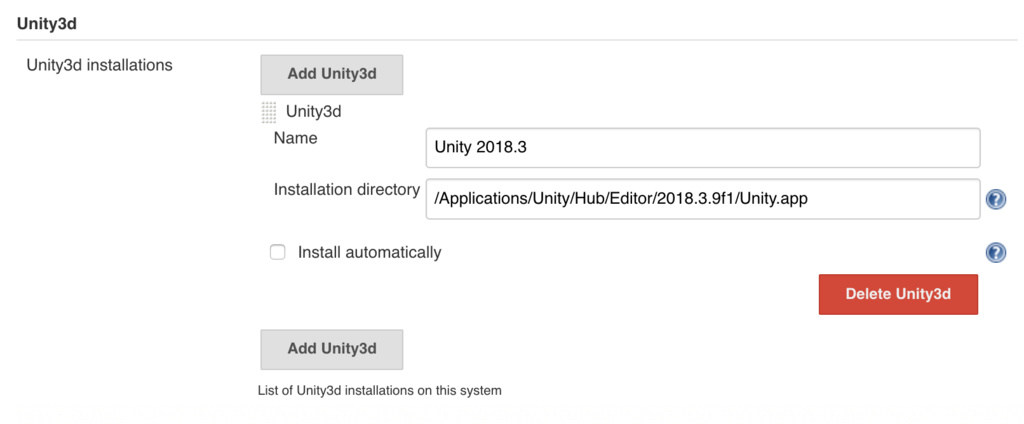
Jenkins then needs to be configured for each installed version of Unity: Jenkins -> Manage Jenkins -> Global Tool Configuration -> Unity3d -> Unity3d installations…
Unity Build Setup
In order for Jenkins to build the project, need to create a new editor class in the project. Note, the Unity3d Plugin reference has an example script in the Usage Guide named Assets/Editor/MyEditorScript.cs, which is out of date for Unity 2018.3. Here’s the VR Dungeons example for building for MacOS located in the project as Assets/Editor/JenkinsBuild.cs. Note: System.Console.WriteLine shows up in the logs as a single line instead of several lines of stack info like Debug.Log!
// -------------------------------------------------------------------------------------------------
// Assets/Editor/JenkinsBuild.cs
// -------------------------------------------------------------------------------------------------
using UnityEngine;
using UnityEditor;
using System.Collections.Generic;
using UnityEditor.Build.Reporting;

// ------------------------------------------------------------------------
// https://docs.unity3d.com/Manual/CommandLineArguments.html
// ------------------------------------------------------------------------
public class JenkinsBuild {

  static string[] EnabledScenes = FindEnabledEditorScenes();

  // ------------------------------------------------------------------------
  // called from Jenkins
  // ------------------------------------------------------------------------
  public static void BuildMacOS(){

    string appName = "AppName";
    string targetDir = "~/Desktop";

    // find: -executeMethod
    //   +1: JenkinsBuild.BuildMacOS
    //   +2: VRDungeons
    //   +3: /Users/Shared/Jenkins/Home/jobs/VRDungeons/builds/47/output
    string[] args = System.Environment.GetCommandLineArgs();
    for (int i=0; i<args.Length; i++){
      if (args[i] == "-executeMethod"){
        if (i+4 < args.Length){
          // BuildMacOS method is args[i+1]
          appName = args[i+2];
          targetDir = args[i+3];
          i += 3;
        }
        else {
          System.Console.WriteLine("[JenkinsBuild] Incorrect Parameters for -executeMethod Format: -executeMethod BuildMacOS <app name> <output dir>");
          return;
        }
      }
    }

    // e.g. // /Users/Shared/Jenkins/Home/jobs/VRDungeons/builds/47/output/VRDungeons.app
    string fullPathAndName = targetDir + System.IO.Path.DirectorySeparatorChar + appName + ".app";
    BuildProject(EnabledScenes, fullPathAndName, BuildTargetGroup.Standalone, BuildTarget.StandaloneOSX, BuildOptions.None);
  }

  // ------------------------------------------------------------------------
  // ------------------------------------------------------------------------
  private static string[] FindEnabledEditorScenes(){

    List<string> EditorScenes = new List<string>();
    foreach (EditorBuildSettingsScene scene in EditorBuildSettings.scenes){
      if (scene.enabled){
        EditorScenes.Add(scene.path);
      }
    }
    return EditorScenes.ToArray();
  }

  // ------------------------------------------------------------------------
  // e.g. BuildTargetGroup.Standalone, BuildTarget.StandaloneOSX
  // ------------------------------------------------------------------------
  private static void BuildProject(string[] scenes, string targetDir, BuildTargetGroup buildTargetGroup, BuildTarget buildTarget, BuildOptions buildOptions){
    System.Console.WriteLine("[JenkinsBuild] Building:" + targetDir + " buildTargetGroup:" + buildTargetGroup.ToString() + " buildTarget:" + buildTarget.ToString());

    // https://docs.unity3d.com/ScriptReference/EditorUserBuildSettings.SwitchActiveBuildTarget.html
    bool switchResult = EditorUserBuildSettings.SwitchActiveBuildTarget(buildTargetGroup, buildTarget);
    if (switchResult){
      System.Console.WriteLine("[JenkinsBuild] Successfully changed Build Target to: " + buildTarget.ToString());
    }
    else {
      System.Console.WriteLine("[JenkinsBuild] Unable to change Build Target to: " + buildTarget.ToString() + " Exiting...");
      return;
    }

    // https://docs.unity3d.com/ScriptReference/BuildPipeline.BuildPlayer.html
    BuildReport buildReport = BuildPipeline.BuildPlayer(scenes, targetDir, buildTarget, buildOptions);
    BuildSummary buildSummary = buildReport.summary;
    if (buildSummary.result == BuildResult.Succeeded){
      System.Console.WriteLine("[JenkinsBuild] Build Success: Time:" + buildSummary.totalTime + " Size:" + buildSummary.totalSize + " bytes");
    }
    else {
      System.Console.WriteLine("[JenkinsBuild] Build Failed: Time:" + buildSummary.totalTime + " Total Errors:" + buildSummary.totalErrors);
    }
  }
}
This script will be used as a build hook for the Jenkins build process in the next step.
Jenkins Build Setup
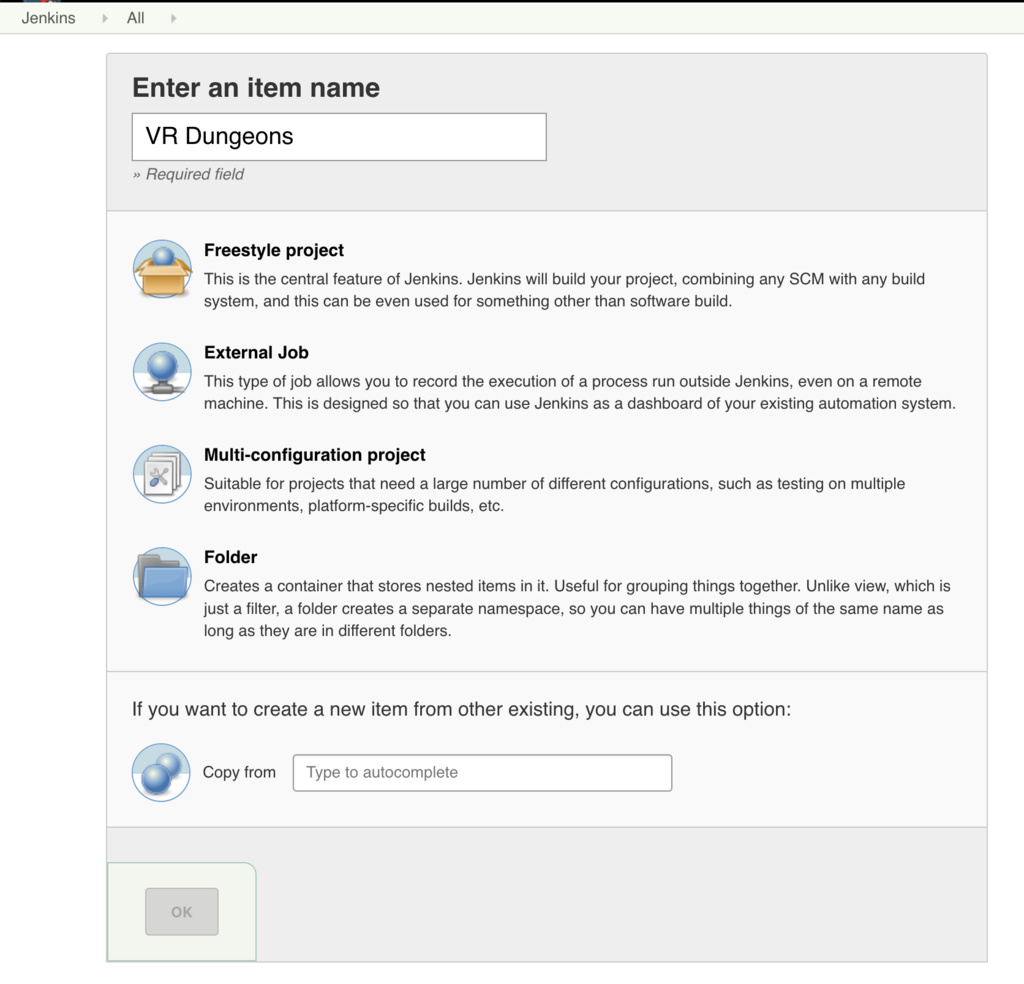
Now that Unity is setup, it’s time to configure Jenkins to build for a project. In this example, I’m going to use a VR Dungeons test project.
First, click New Item in Jenkins, name the project, click Freestyle project, and then OK.
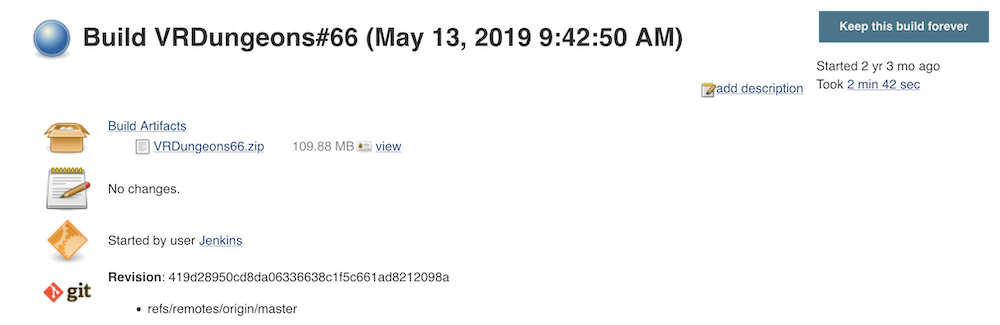
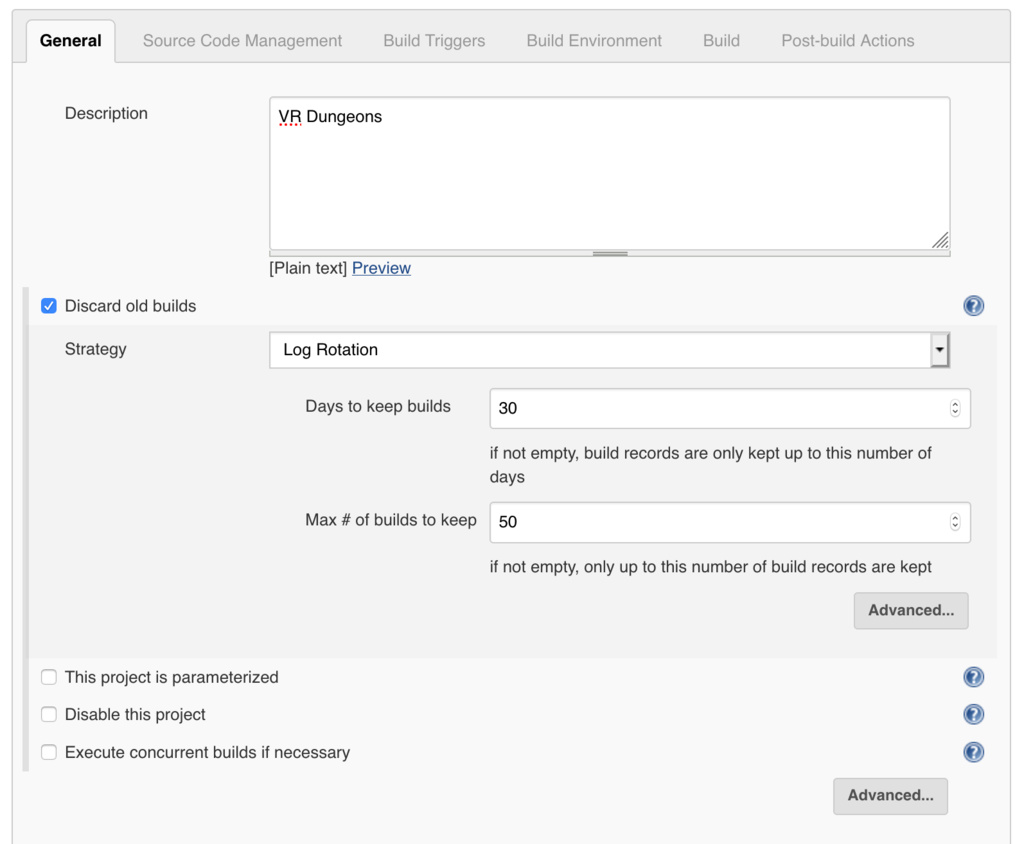
Now, it’s time to fill in the general build details. In this example, I’m discarding old builds after 30 days or if there are more than 50 builds. Note, the specific job directory (e.g. /Users/Shared/Jenkins/Home/jobs/VRDungeons/builds/47) contains the Unity build output and the resulting Zip file, and discarding an old builds will discard the old unity output and zip too.
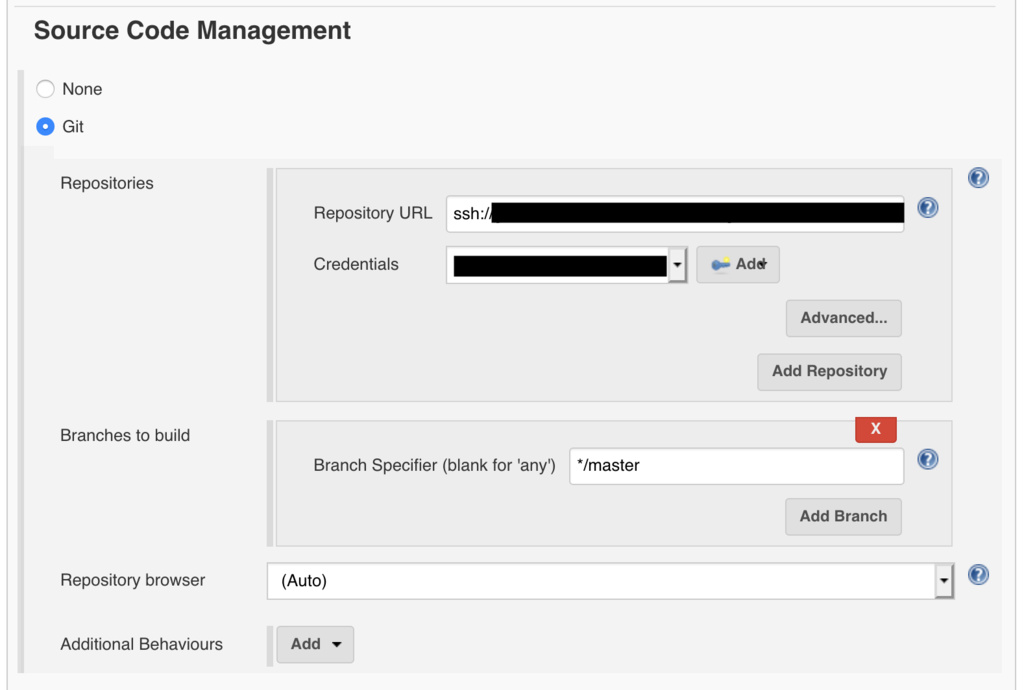
Next, in the Source Code Management section, it’s time to fill in the Git server details. The Repository URL should be the URL you would use to clone the project. The credentials are the credentials setup earlier in the Git Credentials step. The Branch Specifier is the branch to monitor. In this example, Jenkins is only monitoring the master branch, which is only updated after feature or bug fix branches are merged back into master.
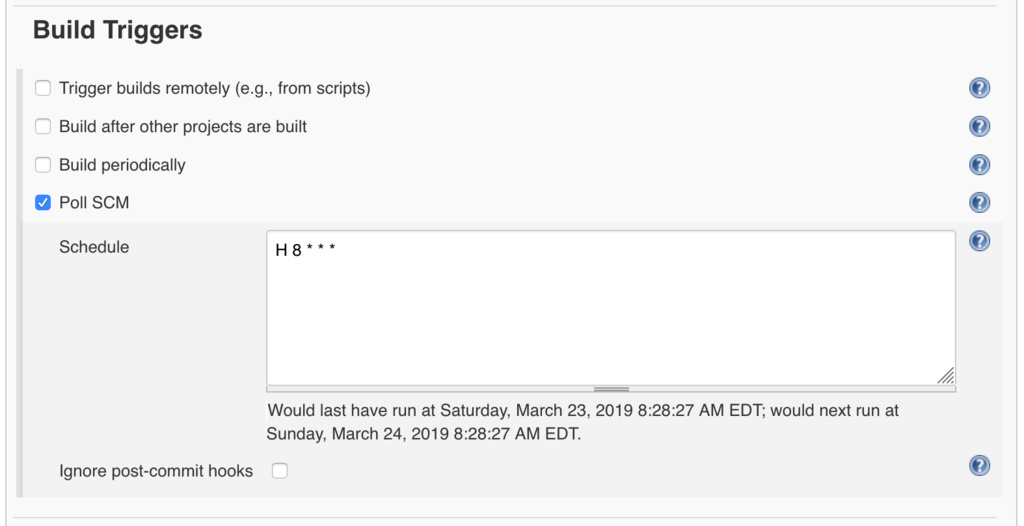
Further, the Build Triggers section is where Jenkins is setup to watch the Git repo. In this example, Jenkins is set to poll the remote repo sometime during the 8am hour (once a day). The schedule is setup similar to cron. For example, */5 * * * would poll every 5 minutes. The H parameter adds additional randomness so all jobs don’t execute at the same time. Click the (?) next to Schedule for exhaustive examples.
Note, Jenkins will store the configured repository locally in the Jenkins/Home/workspace directory (e.g. /Users/Shared/Jenkins/Home/workspace/VRDungeons).
The Build Environment section is where the build is actually configured. In this example, Jenkins is setup to terminate the build if it takes longer than 30 minutes. Normally, the builds take less than 5 minutes at this stage in the project. The Add timestamps to console output adds a timestamp for each line (shown further down).
The Set Build name option configures how Jenkins will name each build. The BUILD_NUMBER is a Jenkins set parameter, and see http://localhost:8080/env-vars.html/ for all supported parameters. In this example, Jenkins uses the Job Name and current Build Number:
${JOB_NAME}#${BUILD_NUMBER}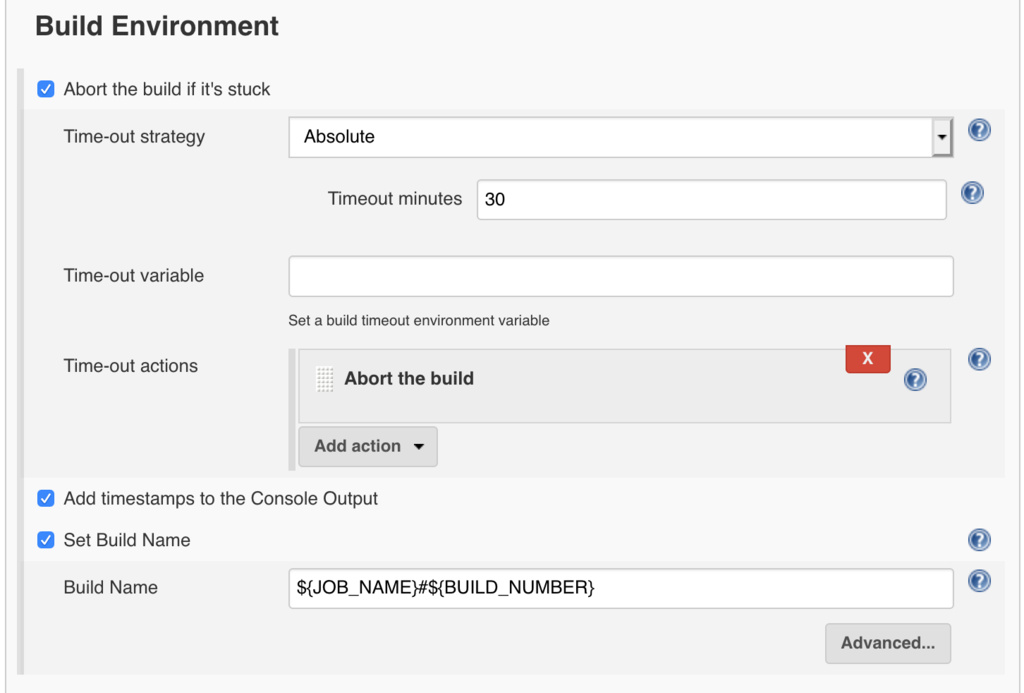
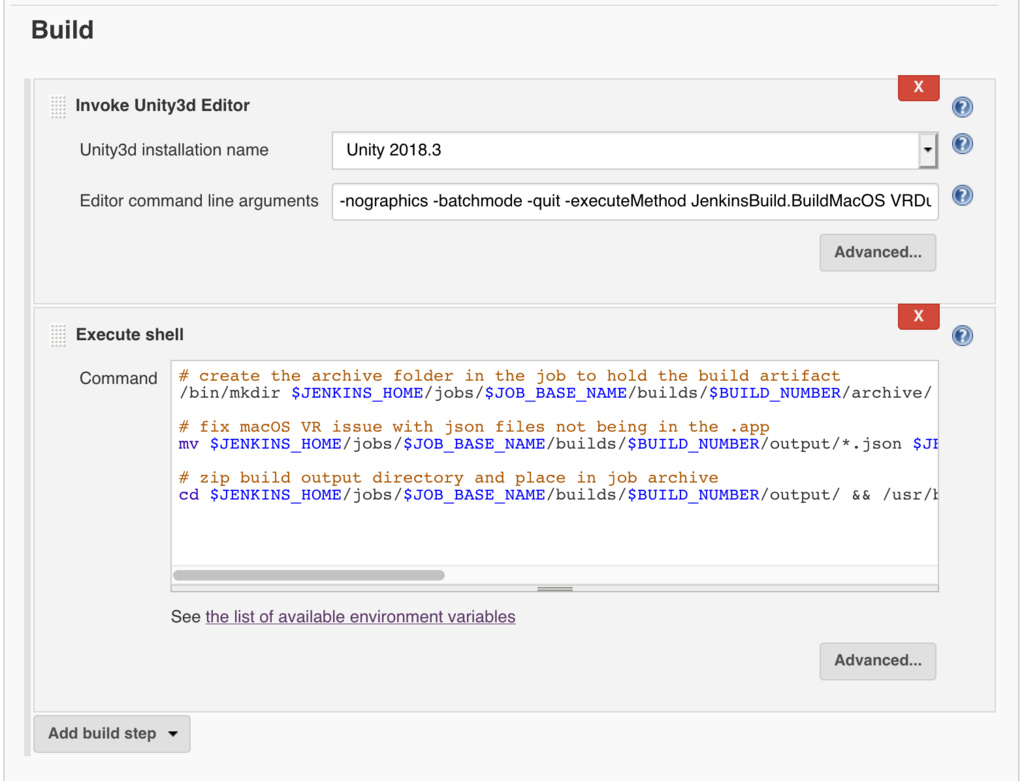
The Build Section, this is where Unity is configured to execute the build. The Unity3d installation name references the Unity3d install configured above.
The Unity3d Editor Command Line Arguments is where the magic happens. In this example, Jenkins passes the following to Unity for the build:
-nographics -batchmode -quit -executeMethod JenkinsBuild.BuildMacOS ${JOB_NAME} "${JENKINS_HOME}"/jobs/${JOB_NAME}/builds/"${BUILD_NUMBER}"/outputThe parameters are as follows: -nographics : prevents the windows server errors when running in batch mode on a headless server -batchmode : run in headless mode -quit : quit Unity3d once all the other commands have finished -executeMethod JenkinsBuild.BuildMacOS: this is where the public static JenkinsBuild.BuildMacOS method is called.
The additional 2 parameters after -executeMethod JenkinsBuild.BuildMacOS are read inside the BuildMacOS method to set additional build information. Note, the “${JOB_NAME}”, “${JENKINS_HOME}”, and “$BUILD_NUMBER” parameters are from Jenkins and allows Unity to build the project to a particular directory. e.g. /Users/Shared/Jenkins/Home/jobs/VRDungeons/builds/47/output
Note, these parameters could also be retrieved via system.environment.getenvironmentvariable.
The Execute Shell section creates the build artifact (the downloadable zip on the build report).
# create the archive folder in the job to hold the build artifact
/bin/mkdir $JENKINS_HOME/jobs/$JOB_BASE_NAME/builds/$BUILD_NUMBER/archive/

# fix macOS VR issue with json files not being in the .app
mv $JENKINS_HOME/jobs/$JOB_BASE_NAME/builds/$BUILD_NUMBER/output/*.json $JENKINS_HOME/jobs/$JOB_BASE_NAME/builds/$BUILD_NUMBER/output/$JOB_BASE_NAME.app

# zip build output directory and place in job archive
cd $JENKINS_HOME/jobs/$JOB_BASE_NAME/builds/$BUILD_NUMBER/output/ && /usr/bin/zip -r $JENKINS_HOME/jobs/$JOB_BASE_NAME/builds/$BUILD_NUMBER/archive/$JOB_BASE_NAME$BUILD_NUMBER.zip *
As an example, for the project VRDungeons build #47, the above uses the following directories which are automatically created during the build:
- JOBS DIR: /Users/Shared/Jenkins/Home/jobs/VRDungeons
- BUILDS DIR: /Users/Shared/Jenkins/Home/jobs/VRDungeons/builds
- SPECIFIC BUILD DIR: /Users/Shared/Jenkins/Home/jobs/VRDungeons/builds/47
- UNITY OUTPUT DIR: /Users/Shared/Jenkins/Home/jobs/VRDungeons/builds/47/output
- FINAL ZIP DIR: /Users/Shared/Jenkins/Home/jobs/VRDungeons/builds/47/archive
- FINAL ZIP: /Users/Shared/Jenkins/Home/jobs/VRDungeons/builds/47/archive/VRDungeons47.zip
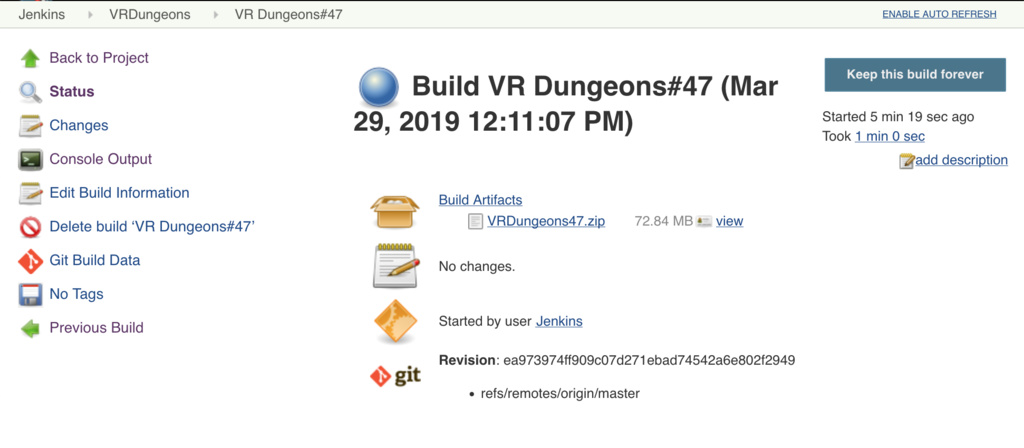
The Final Zip is what Jenkins calls a Build Artifact and will be downloadable in Jenkins from the Project page or the specific build page.
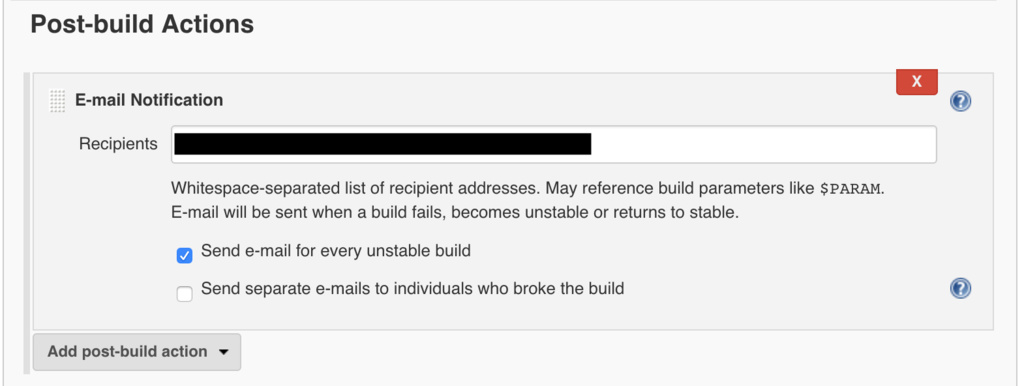
The final section is Post-build Actions. In here, Jenkins will send an email if there is an unstable/failed build.
Once everything is set, click Save! If you just want to snapshot save and stay on the page to continue editing, click Apply.
Test Jenkins Build
After saving, Jenkins will show the Project view. Click, “Build Now” to schedule a build to test the build process out. Once it starts, the Build will show in the Build History section. Click the in progress build link (e.g. VR Dungeons#47) to see the details.
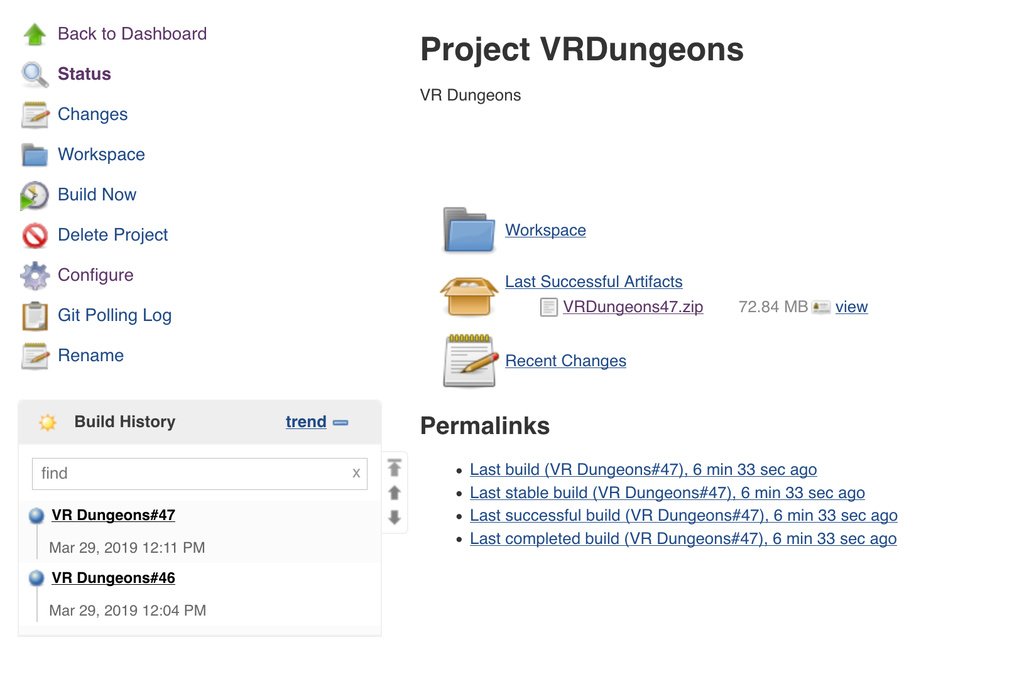
Next, click Console Output to watch the build progress live. Searching for [JenkinsBuild] will show the console output lines from the build script. If successful, the build should be waiting in the Job’s archive directory (e.g. /Users/Shared/Jenkins/Home/jobs/VRDungeons/builds/47/archive/VRDungeons47.zip) and downloadable as a Build Artifact.
All done, the new build is ready! From here on, Jenkins will automatically create new builds at 8am if there are any changes on the master branch.
In the future, I’ll add additional information on build actions such as automatically uploading the bundle to Steam, itch.io, etc.
Helpful References
- https://jenkins.io/download/
- https://jenkins.io/download/thank-you-downloading-osx-installer-stable/
- https://jenkins.io/doc/
- https://plugins.jenkins.io/unity3d-plugin
- https://docs.unity3d.com/Manual/CommandLineArguments.html
In Closing
Hope you found this article on Unity Build Automation with Jenkins interesting,
Jesse from Smash/Riot